Posts tagged: photography

Why take a photography class?

Congratulations, you’ve recently purchased a new Digital Single Lens Reflex (DSLR) camera.  You look over the manual and realize you may be in over your head but at least it has a program mode for use as a point and shoot camera with which you’re familiar.  After a bit you begin to think that taking a photography class to learn how to use the new DSLR wouldn’t be a bad idea.

There are a number of reasons why someone would take a photography class and creating better pictures is the end result of all of them.  That new camera is just a tool that is used to create pictures but if you don’t know how to use that tool properly, your pictures won’t get better…in fact they may get worse.  So let’s discuss a few reasons to take a photography class.
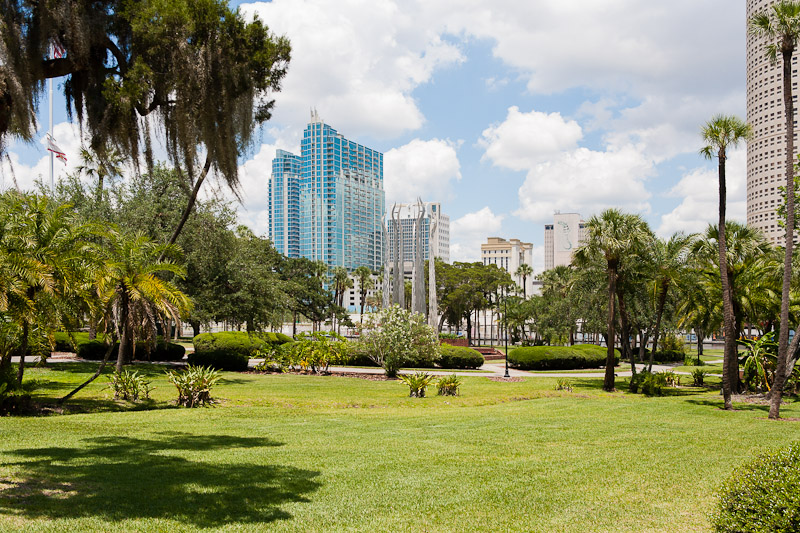
Downtown Tampa, Fl. from University of Tampa park.

One is learning photography from someone who is in the business.  They can provide valuable feedback on the pictures you make so you can improve.  You can ask them generic or specific questions to aid in your understanding of photography, use of the equipment, and various techniques to capture images.  Essentially gaining knowledge from their experience and expertise.

Another reason to take a photography class is to learn about the tools you use to take pictures.  Why is it called a digital single lens reflex camera?  What kind of lens is used for shooting sports, portraits, landscapes?  What is the shutter, aperture, ISO or white balance and how are they used?  How to compose a shot that has that WOW factor people like to look at.  How do I hold this big camera?  Learning the basic science and techniques of photography can help you to take better pictures.

In a classroom or workshop environment there is the opportunity to learn from other classmates about how they made a particular photo.  If they use a technique that no one else is doing, or may be using one that you are having trouble with, they may be able to help.  Plus most discussions are open and can range far and wide from the material being presented.

Finally to have fun!  When you understand the basic principles of photography and composition and can use them without thinking, then you can expand and start breaking these principles to make new, interesting, and just plain fun images.  And you’ll have a lot more fun with your camera because you’ll be taking better pictures and having many more keepers!

Introduction to DSLR Photography and Creating Better Photos” is a class designed for the new to almost intermediate use who has moved up to a DSLR camera.  At the completion of this class,  you’ll have a good grasp of the basic principles of photography and composition.  You’ll understand more about which lens to use to gain the effect you’re looking for in a picture.  And you’ll have a introductory knowledge of using workflow tools to find and manipulate the pictures you’ve taken.  So check out the class on the DSLR Photography Class page on this website and register soon.

An HDR Image for the Client

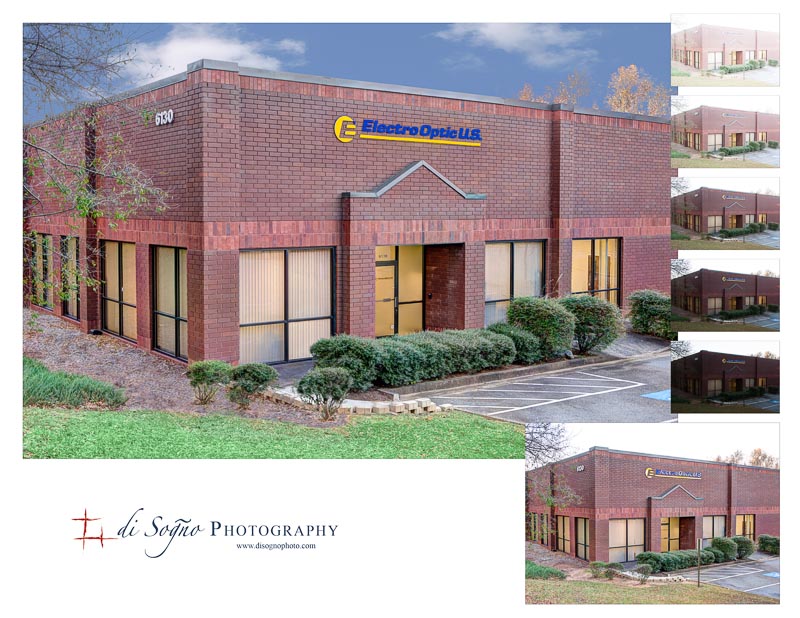
I’m in the middle of a project for Electro-Optic US, a die-cutting manufacturing company based in Alpharetta, GA.  One piece of this project is to create a exterior image of the US headquarters of the company.  Sounds easy right?  Not necessarily so.  Creating an exterior image of a building takes more work than you may think.

The entrance to Electro-Optic US is on the north elevation and because the sun is so far south at this time of year, there would be very dark shadows on that side of the building.  No matter what time of day the shot would be taken, if the sun was above the horizon, the dynamic range of the image (that’s the difference between the brightest part of the image compared to the darkest part of the image) would be too large to correct in post-processing.  And since Markus, the president of Electro-Optic US, wanted the focus to be on the building and not any cars that may be in the parking lot, I created the images below when they were closed and during that 20-30 minutes between dawn and sunrise when daylight first appears early on a Saturday morning.

Creating an Image

I captured the five small images on the right side of the image above just after dawn using five different exposures to capture the brights of the lights, the darks of the shadows and everything in between. You can see them better by clicking on the image to enlarge it in your browser.  I then merged them together in software to create the High Dynamic Range (HDR) image in the lower right of frame.

This created a very workable image but there were things that needed to be fixed before I would call it a finished image, ready for delivery to the client.  For instance the dull sky needed to be replaced and distractions like the signpost removed, the brown grass made to look greener, replacing missing pine straw around the bushes and straightening the crooked window shades all needed to be fixed.  There was even some foliage added to the three bushes at the front so they would look healthier.  That’s an image I’m proud to present to a client.

If you are or if you know a business owner who wants their building to be seen in the best light, even if the images were taken before the sun came up, tell then you know someone who can create that image, point them to this post and introduce us in an email or over coffee.  Thanks for visiting the blog, and remember, I don’t just take pictures, I create images.

Companion Reference for Intro to DSLR Class

Updated version for the companion to the Introduction to DSLR Photography and Taking Better Photos course. Included with enrollment in the class or can be purchased separately by clicking on the red button below.

For more information on photography classes in Roswell, visit our training page.

Intro to DSLR V2.0

By Tony Fiorda

80 pages, published 10/13/2012

A companion book for the Introduction to DSLR Photography and Creating Better Photos class created and taught by di Sogno Photography, designed to be used as reference after taking the course. The first and second sections cover common camera features and functions and the basic technical aspects of photography such as aperture, shutter speed, ISO, white balance, focus modes, depth of field, lenses and their effects. The third section…

Another teaser…Fill the Frame!

With only a week left before the next Intro to DSLR class, I thought I’d send out another little teaser with some other information that students who attend the class will learn.

Fill the Frame

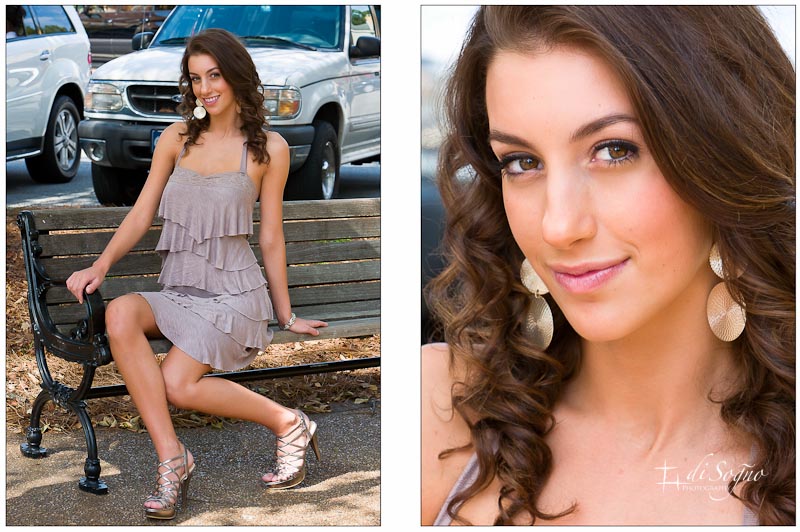
Making the subject too small in the frame of an image can make the viewer wonder what the intended subject is.  The image above left was intended to display a bit of Rachael’s personality and highlight her smile.  While we can see her smile, when I look at this image, my attention drifts away from her to the items that surround her on the ground and in the background.  This is the result of her being relatively small in the frame (and maybe because I’m getting older) and having a cluttered background.

In the image on the right, she fills the frame of the photograph, her gaze keeps my attention where it should be and we’ve removed the distracting background clutter.  This image shows some of Rachael’s personality, and highlights her eyes and fantastic smile instead of letting the viewer check out all of the other stuff.

The upcoming February class is the last one for this quarter.  I’ve tentatively scheduled the next class for sometime in May.

Oh!  Before I forget, we will not have class on Tuesday February 14, I think we’d all like to be somewhere else that evening.  We’ll decide when to move that date on the first night of class.

Okay that’s it for now.  Hope to see you in one of the classes!


A little teaser…Depth of Field

With the questions I’ve been getting about the introductory photography course I teach, I thought I’d start giving a little teaser from time to time and share some of what is covered in the course.  So here’s the first one!

Depth of Field

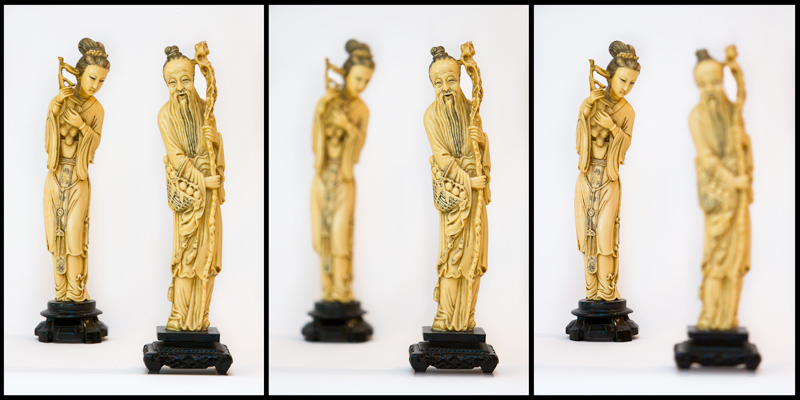
Without a focus, we drift around not being very successful at anything we may do.  The same is true for an image, without a focus, the viewer doesn’t know where to look and the image isn’t very successful.  Depth of Field (DOF), defined as that part of an image that is acceptably sharp, provides creative control over what is in-focus or not in-focus in the image.

The figurines in these images are twelve inches apart and by changing the aperture to control the DOF,  the photographer can isolate individual figurines or have them both in-focus thereby controlling the focus of image and where the viewers attention is going to stay.

This is just one of the many tools students in my Introduction to DSLR Photography & Creating Better Photos class learn to use.  So if you or someone you know would like to learn more about photography, check it out by clicking the above link.

That’s it until the next time!

I can hardly wait!

I hope you all had a great Thanksgiving holiday and aren’t too stressed about being in the Christmas season and all that brings.  For me, it’s almost here and I can hardly wait.  No, I’m not talking about Christmas like Alvin, Simon and Theodore; I’m talking about teaching the Introduction to DSLR Photography and Creating Better Photos course starting tomorrow night (11/29).  As a reminder, it’s a total of 12 hours training for $149.00 and spans four nights over two weeks, Tuesday and Thursday of each week.

I’m gathering the presentation, the textbooks, the projector and screen and even a lot of my equipment in one place so I don’t forget anything.  I’m really looking forward to meeting all of the attendees in the class and being able to transfer knowledge and techniques that will help them understand their camera and create better photos.  They’ll get a lot of information each night and go home with a 70 page book that can be a reference for the future.

Yes, there’s still time to register if you or someone you know would be interested, and yes, it will be repeated after the first of the year for those that might be getting a new camera from Santa!  So, as far as the course is concerned, hurry fast cause I can hardly wait!

p.s. I promised not to tell who, but I know there are some LUCKY folks out there because Santa has already picked up some tickets for next years classes to hand out as gifts.

Ho! Ho! Ho!


Training Now Available

For the past few years, people I’ve met have been telling me that if I had a class on digital photography, they would attend.  I’ve listened to them and I’m pleased to say that I have added a new service to my business, training.

I am now doing personalized individual or small group (up to 5 students) training.  This training is fully customizable for the student’s needs and is targeted at the beginning or intermediate photographer who cannot find time for a regularly scheduled class but wants to better their skills.  Click on ‘TRAINING’ in the main menu to find out more info and pricing for this training.

I have also developed and published a new classroom style training course called ‘Introduction to DSLR Photography & Creating Better Photos’.  This course is a hybrid of a digital photography 101 class and a photographic composition class.  It’s designed to be given in four (4) evenings over two weeks and covers some of the technical aspects of photography, what the camera’s buttons and functions do, how to compose images to make them more interesting and what to do with those images after you capture them.  This is presented at a fairly high level so the student won’t get lost.  Click here for more information and to register.

Additionally, I’ve made the book for that course available for purchase by anyone who wishes they could get a copy for reference or self study, including those who can’t find the time in their busy schedule to attend.  Click on the image below to see a preview and to purchase a copy of the book.

That’s it for now, but don’t forget, if you or someone you know has a DSLR or will be getting a new DSLR for the holidays, this course is an excellent opportunity to learn more about digital photography and how to create better photos.  It makes a great holiday gift, too!


Shooting for a Class

In the next month or so, I’ll be starting up a beginners course in using a digital SLR camera and how to take better photos.  I’d have thought that with all of the images I’ve taken in and around the Atlanta area, I’d have everything I needed to visually demonstrate the various concepts outlined in the course.  But that wasn’t the case.  To fill in the holes, I placed a casting call on a popular modeling site; Rachael Boone answered the call and the shoot was scheduled.  Two of the concepts we shot were lens perspective and the effects of aperture on the image.

We started in a small square in the Roswell Historic District that’s quiet, has fairly low foot traffic and shops that show in the background. Rachael posed so the shops were to her back and I started across the square from her using a long focal length lens.  The lens perspective effect is seen by keeping the subject, in this case Rachael, the same size in the frame and shoot with a consecutively shorter focal length lens.

This series demonstrates the effects lens perspective has on images.  At 400mm, the image shows the effects of lens compression and it looks as though Rachael is directly in front of the shops.  As the focal length decreases, the images start to show depth and finally at 24mm, it looks as though the shops are very far away.

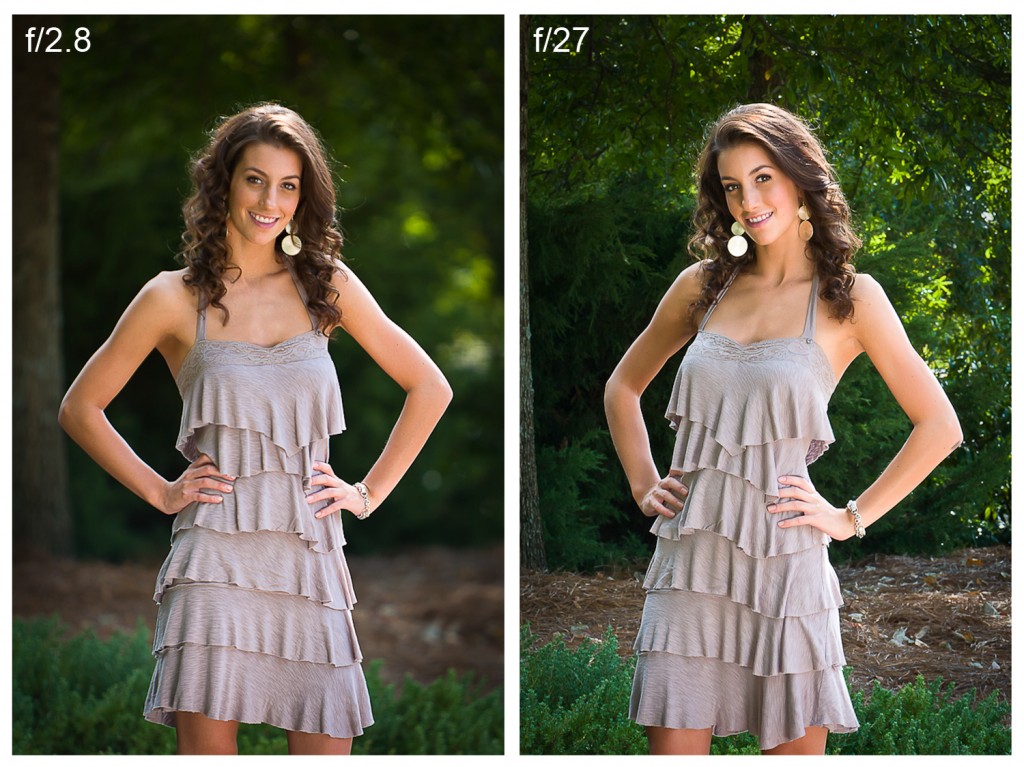
The lens aperture used to create an image has large effect on the image too.  It creates the depth of field, the area in the image that is in focus, in the image.  Depth of field can bring the total image in to sharp focus or allow the photographer to keep only the subject in focus and thus keep the viewers attention there.

In these images, at the shallow depth of field an aperture of f/2.8 creates, the foliage behind Rachael has a pleasant blur and the viewers attention is drawn to her great smile.  An aperture of f/27, creates a large depth of field and adds the probability that the viewer will glance at Rachael but then start scanning the image to see what else may be in it.

These are just small tastes of what will be covered in the class.  I’m looking forward to starting it up and transferring some of the knowledge I picked up as commercial photographer over the years.

I also want to thank Rachael for helping me in creating these images.  She made my job much easier!  Stay tuned for more info about the “Introduction to DSLR Photography and Taking Better Photos” class.


Looking for an Atlanta photographer…

“I ‘googled’ using terms like ‘Atlanta’, ‘Alpharetta’, ‘head shot’ and ‘photographer’ while looking for someone to create my image.  You came up in the search.  I looked at a couple of other websites prior to viewing yours and compared to those sites, I thought yours was very professional, well done and easy to navigate.  When I looked at your images, I knew you were the photographer I wanted to create mine.”  Steve said that when I was curious and asked how he had found me.  Because he’s a salesman at a technology company, I wasn’t surprised when he answered using search terms instead of just saying “Google”.

He’s been with his company for a while now and they’ve long asked him to get a professional head shot done for their website, marketing and sales collateral, and to have something to use for speaking engagements.

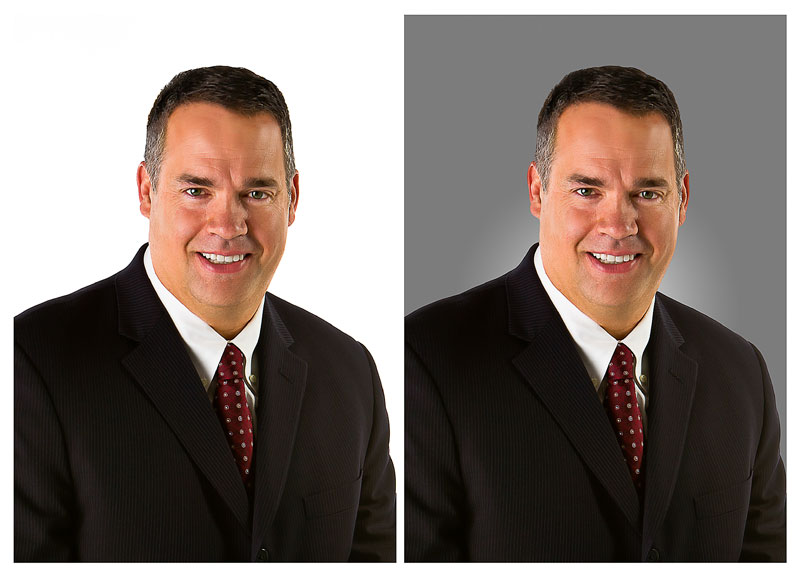
The images were created on a standard white background to make them as generic as possible.  Steve, being a bit more discerning, wanted his images to stand out more.  Working some Photoshop magic, I exchanged the standard white background with a mid-grey color and added a gradient to separate him from the background.

Backgrounds make a new image!

Both images are fantastic and although I’ve been doing this for a while now, it sometimes surprises me how a change like this creates a different feel to the image.  Steve decided to go with the image on the right.  What do you think?

As an Atlanta photographer I strive to separate myself from the pack and it’s always nice to hear when people notice.  I want to thank Steve for being so detailed in his answer to my query and for choosing me to create his executive portrait.

New Site-New Blog-Great Development Team-Gratitude

New Web Site and Blog

As you can see,  I had the site converted to a format that is much easier to modify, post and add as many image galleries as I want.  It’s based on WordPress and I am extremely pleased with the usability of this format.  Why I didn’t move to this format earlier, I don’t know, but I’m glad I did and I won’t be moving back to a standard HTML site any time soon.

Look for more frequent updates to the blog and the site itself.

Great Development Team

I want to put in a good word about the development team that put this together.  I met Joel Quinn of Quinn Companies a few months ago when he came in for an executive portrait and convinced me to go with his team of companies to create this new site.  He has roughly ten different companies under his direction, all of which work in some area of the web, IT resource management, backup services, data warehousing, SEO optimization and even cell phone and printer repair.

Joel Quinn

Joel introduced me to Derek Dirks of SEO Blink.  Derek, is doing my SEO optimization and was my point of contact between the developers and this WordPress rookie.  He is very knowledgeable, easy to work with and, at times, had the patience of Job with some of the questions I was throwing his way.  For me, he directed a team of people to not only answer all of my questions, but they were able to handle a very difficult conversion issue along the way.

We ran in to an issue converting the original blog to a compatible format.  The original blog was built on a propietary system and even though I was able to supply the team a database of my blog entries, it wasn’t an easy task to perform the conversion because it was a custom database.  I’m not sure of the database programmers name, but he did a fantastic job of converting it so that I wouldn’t have to do it the hard way…copy from the old, and paste to the new.  Essentially manually recreating 3 years worth of blog posts or losing them.  This saved me about 8 hours of work.  Many cudo’s to the team on that one!

I’m happy to say that without Derek and the rest of the team, this site would not be up and running in it’s current form and I’d still be flopping around like a fish out of water trying to do the conversion.  Derek, thanks for all you did during this process.

And thanks to everyone who was invovled with converting this site and educating me in how to keep it updated.  I look forward to a long relationship with this group of people!  Joel, you were right, your people can do just about anything!

Contact us

di Sogno Photography
e: info@disognophoto.com